 Save to Pinterest
 I'll never forget the first time I crafted a cheese board that made my guests actually pause mid-conversation. It was at a gallery opening where a friend needed last-minute appetizers, and I arrived with this elegant arrangement—cheeses and cured meats arranged like jewels along the rim of a beautiful marble board, the center dramatically bare. Everyone kept circling it, drawn to the presentation as much as the flavors. That's when I realized a board isn't just food; it's an invitation to slow down and savor.
I remember arranging this board for my sister's engagement party, watching her eyes light up as people naturally gravitated toward the rim, creating these little conversations around each section. The gold-rimmed marble seemed to glow under the evening light, and suddenly a cheese board felt like the most elegant thing at the celebration.
Ingredients
- Triple-cream Brie (120 g, cut into slim wedges): This is the creamy anchor of your board—the one that makes people close their eyes. Cut it into wedges just before serving so it stays silky; once it sits, it firms up slightly and loses that luxurious texture
- Aged Manchego (120 g, sliced): This Spanish cheese brings a nutty, slightly crystalline crunch that contrasts beautifully with softer cheeses. The pale gold color is visually stunning along the rim
- Blue cheese (100 g, crumbled or sliced): The bold statement cheese—use it sparingly because it commands attention. I prefer leaving it in chunks rather than crumbling, so guests can take what they want
- Goat cheese (100 g, formed into small rounds): Roll these in fresh herbs or crushed pistachios just before serving for extra elegance and a flavor pop that people always ask about
- Prosciutto (100 g, folded into ribbons): The translucence of properly folded prosciutto catches light beautifully. Don't unfold it completely; those loose, draped ribbons add movement to the arrangement
- Thinly sliced salami (120 g): Choose a quality salami with good color variation—it becomes part of your color palette. Layer it slightly so you see the beautiful marbling
- Coppa or bresaola (100 g): The deep red tones here balance the creams and golds. Bresaola especially brings an almost wine-like sophistication to the board
- Red and green grapes (2 small bunches): Leave them in small clusters on the stem when possible—they nestle into the rim beautifully and their natural shine reflects light
- Pear and apple (1 each, thinly sliced): Slice these just before serving and place them on top of other items rather than directly on the board—this keeps them from oxidizing and looks more intentional. Toss them in a tiny bit of lemon juice if you're arranging more than 15 minutes ahead
- Dried apricots (1 small handful): Their jewel-like orange color provides visual warmth and natural sweetness that bridges the salty and creamy elements
- Marcona almonds (1/4 cup): These are buttery and slightly sweet—so much better than regular almonds for a board this elegant. Their oval shape nestles perfectly along edges
- Salted pistachios (1/4 cup): The green brings vibrancy, and the natural salt plays beautifully with the rich cheeses. I sometimes crush a few to sprinkle near the goat cheese for color
- Castelvetrano olives (1/4 cup): Buttery, mild, and that gorgeous pale green—people who say they don't like olives often love these. Serve them in a small shallow bowl nestled into the rim
- Cornichons (1/4 cup): These tiny pickles refresh the palate and their sharp bite cuts through the richness. Place them in their own small vessel along the edge
- Fig jam or quince paste (1/4 cup): This is where sweet meets savory in the most elegant way. Serve in a small ramekin; it becomes a destination people visit multiple times throughout the gathering
- Honeycomb or honey drizzle: If you can find honeycomb, it's worth every penny—the texture and visual impact are unforgettable. If using honey, drizzle it just before serving for that fresh gleam
- Baguette, thinly sliced and lightly toasted (1): Toast just before arranging so it's still warm and crisp. The slight color adds warmth to your palette, and the warmth brings out bread's natural sweetness
- Assorted crackers (1 box): Choose varieties with different textures and colors—water crackers for elegance, seed crackers for earthiness, and perhaps something with herbs for visual interest
Tired of Takeout? 🥡
Get 10 meals you can make faster than delivery arrives. Seriously.
One email. No spam. Unsubscribe anytime.
Instructions
- Choose your stage:
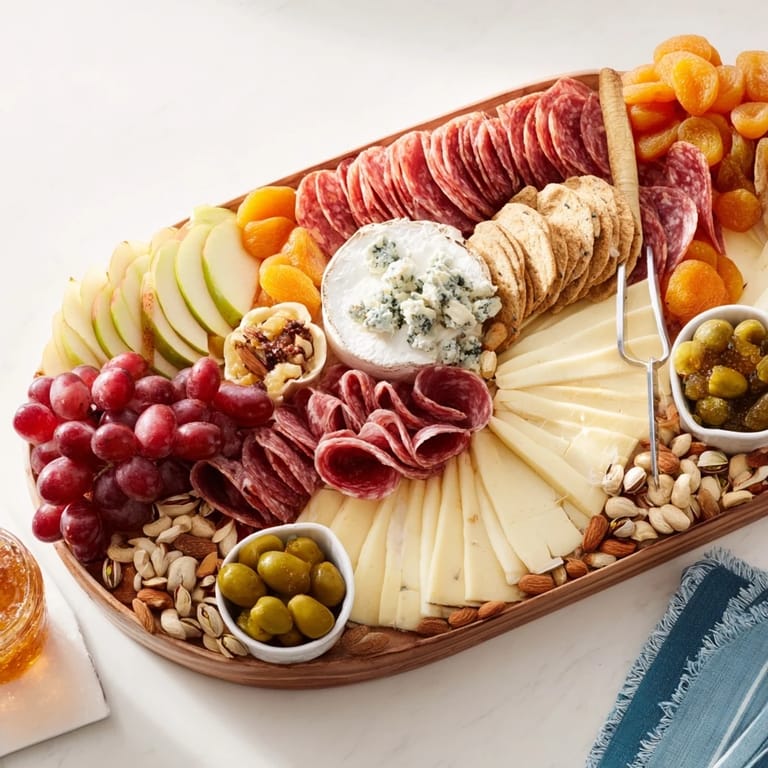
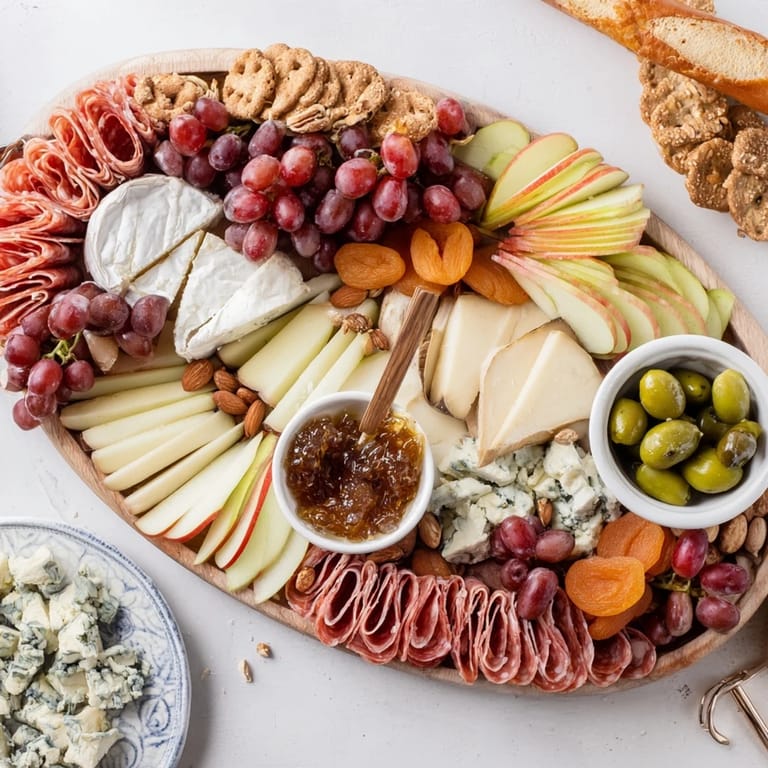
- Select a board with a truly prominent rim—this is everything. A wooden round at least 16 inches across, or an oval marble board if you have one. The rim needs to be substantial enough to hold all your treasures. I always run my fingers along it first, imagining how items will nestle into the shape.
- Arrange the cheeses first:
- Begin with your four cheeses spaced around the rim, creating anchors for everything else. Place the Brie wedges first since they're the creamiest—position them where they'll catch light. Let the Manchego's pale gold speak for itself in its own section. Position blue cheese where you want a visual pop. The goat cheese rounds feel right opposite the Brie, creating balance. This is your foundation, and spacing them well means you have room to build around them.
- Weave in the charcuterie:
- This is where it becomes a puzzle you're solving with your hands. Fold the prosciutto into loose ribbons—let it billow a little. Layer salami in overlapping circles, almost like flower petals. Drape the coppa or bresaola wherever you see empty space, always thinking about color contrast. Step back after each addition. You're not filling space; you're creating a visual story as you move around the rim.
- Tuck in fresh fruits:
- Grapes go into little clusters—their stems help hold them in place. Slice your pear and apple just before you place them, and lay them over nearby cheeses and nuts so they stay visible and don't brown. Scatter dried apricots into gaps; their color will anchor other elements nearby. Each fruit should look intentional, not accidental.
- Place nuts and accompaniments:
- Almonds and pistachios fill small gaps and add texture. I like to create little groups of three or four nuts rather than scattering them individually. Nestle your small bowls of olives, cornichons, and jam into the rim, treating them as design elements. Each bowl should feel like it belongs in the composition.
- Add the crackers and bread:
- Prop your toasted baguette slices and crackers upright at angles along the rim, leaning them against cheeses or other items. This creates height variation and tells people these are meant for building bites. Don't lay them flat; the angle is what makes it feel sophisticated.
- Crown it with the final touches:
- Drizzle honey or place your honeycomb in a visible spot—this is your gleaming finale. If using edible gold leaf, add it just before serving directly onto the goat cheese or near the honey. Step back and look at your work. Walk around it. Is there a section that feels too dense? Open it up. Does somewhere feel sparse? Add a cluster of grapes or a few nuts. This is your moment to trust your eye.
- Leave the center intentionally bare:
- This is the secret—the empty space is as important as what you've arranged. It lets the board's shape shine and creates visual breathing room. Don't be tempted to fill it. The restraint is what makes it elegant.
- Serve with grace:
- Place cheese knives and small tongs nearby. Keep the board at room temperature—this is when every cheese tastes its best, when every flavor sings. Bring it to the table and watch people naturally begin to circle and converse. This is what you've created: not just a meal, but a moment.
 Save to Pinterest
 What touched me most was when someone at that gallery opening said the board made them think about gathering itself—how the arrangement created conversation and intention. I realized that this isn't just about arranging cheese; it's about creating a moment where people slow down together.
The Art of Visual Arrangement
This board is a study in restraint and confidence. I've learned that negative space—that bare center—is what separates a board people photograph from a board people forget. The rim becomes a frame for your edible masterpiece. Think of it like a necklace where the chain (your board's rim) holds the gems (your ingredients) in positions of honor. Every item you place should feel like it has a reason for being there, whether that's color, texture, or flavor balance.
Creating Flavor Pairings at the Table
One of the joys of this style of board is watching people discover combinations. I've noticed guests naturally create pairings as they build bites—manchego with fig jam, prosciutto with honeycomb, blue cheese with an almond. The arrangement guides these discoveries without forcing them. Position items so natural pairings are near each other; place your fig jam where it can easily meet bread and goat cheese, position the honeycomb near the Brie where it's an obvious match. You're creating a edible conversation starter.
Hosting Moments That Feel Effortless
The beauty of this board is that it looks complicated but asks almost nothing of you. You prep everything ahead, arrange it in minutes, then actually get to enjoy your guests instead of being stuck in the kitchen. I always set up my board an hour before people arrive, then take a moment alone with it—adjusting one cluster of grapes, ensuring the honey drizzle catches light. This quiet moment before guests arrive is when a board becomes personal instead of just pretty. It's also your chance to refill any small bowls or adjust anything that shifted.
- Prep all ingredients the night before if you can—slice your cheeses and meats, toast your bread, gather your nuts—so arranging is just assembly
- If you're traveling with this board, keep everything except the cheeses in separate containers and arrange on-site for maximum freshness and visual impact
- Have extra of your favorite items nearby; good boards get depleted in sections—be ready with more prosciutto or almonds to refresh areas that get loved most
 Save to Pinterest
 This board taught me that hospitality is about creating space for people to gather, not about showing off. When you serve this with intention and care, it becomes more than ingredients—it becomes an invitation.
Recipe FAQs
- → How should the board be arranged?
Place all cheeses, meats, fruits, nuts, and accompaniments exclusively along the board’s outer rim, leaving the center clear for visual impact.
- → Can this spread be made vegetarian?
Yes, omit the charcuterie and add marinated artichoke hearts, roasted peppers, or extra cheeses as alternatives.
- → What drinks pair well with this selection?
Champagne, sparkling wine, or a crisp Sauvignon Blanc complement the flavors beautifully.
- → How to enhance the presentation for special occasions?
Add edible gold leaf or gold-dusted nuts to elevate the board’s festive appeal.
- → What tools are necessary for serving?
Use cheese knives and tongs, along with small bowls for jams, honey, and olives, to facilitate serving.