 Save to Pinterest
 I'll never forget the year my aunt brought these cheese ball ornaments to our family gathering. I was mesmerized watching her arrange them on the platter like she was decorating a tree, each one glistening with a different coating. When I finally tasted one—that creamy, savory blend with the nutty crunch—I knew I had to master this recipe myself. Now, every holiday season, I make these beautifully crafted bites, and they've become the appetizer guests ask about before they even take off their coats.
I remember making these for the first time when my sister was hosting a holiday party and I wanted to contribute something that would actually impress. She stood in the kitchen watching me roll those cheese balls, and when she saw me inserting the rosemary sprigs like tiny tree toppers, she laughed and said they looked like edible Christmas magic. That moment—her genuine delight—made me realize this recipe was about so much more than cheese and crackers.
Ingredients
- Cream cheese (8 oz): This is your foundation, so make sure it's actually softened before you start mixing. Cold cream cheese will resist blending and create lumps that ruin the smooth texture you're going for. Let it sit on the counter for 20 minutes if you're in a rush.
- Shredded sharp cheddar cheese (1 cup): The sharpness cuts through the richness of the cream cheese with this wonderful tangy note. Don't use pre-shredded cheese if you can help it—the anti-caking agents make the mixture slightly grainy.
- Shredded mozzarella cheese (1 cup): This adds stretch and a milder flavor that balances the sharp cheddar beautifully. It also helps bind everything together like edible glue.
- Fresh chives (2 tbsp, finely chopped): Fresh herbs make all the difference here. They add a subtle onion-like brightness that makes people ask what that mysterious flavor is.
- Dijon mustard (1 tbsp): Just a tablespoon, but it's the secret that makes people pause and wonder why these taste so complex. It adds sophisticated depth without tasting like mustard.
- Garlic powder (1/2 tsp): Use fresh minced garlic instead if you want an even more pronounced savory kick, though the powder gives a more refined, even distribution.
- Salt and pepper (to taste): Taste as you go here. You'd be surprised how much seasoning cheese can handle without becoming overwhelming.
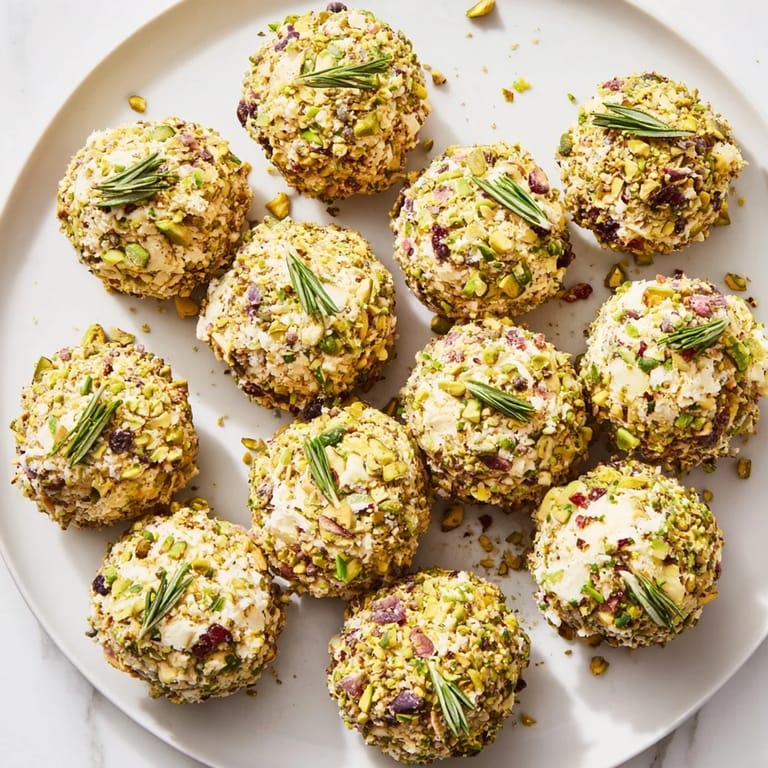
- Ornament coatings (choose 3–4): Pistachios for elegant earthiness, cranberries for tart sweetness, poppy seeds for texture and visual contrast, fresh parsley for brightness, roasted red peppers for sweetness and color, walnuts for hearty crunch. Mix and match based on what you have and what color palette speaks to you.
- Rosemary sprigs (12 small): These tiny branches become your ornament hooks. Fresh is always better than dried—they look more elegant and smell incredible.
Tired of Takeout? 🥡
Get 10 meals you can make faster than delivery arrives. Seriously.
One email. No spam. Unsubscribe anytime.
Instructions
- Create Your Cheese Base:
- In a medium bowl, combine your softened cream cheese with the shredded cheddar and mozzarella. Feel the texture with your hands if you need to—mixing with a spoon works, but your fingers actually do a better job of breaking down any resistant pockets of cold cheese. Add the fresh chives, Dijon mustard, garlic powder, salt, and pepper. Mix until everything is completely smooth and uniform, like a soft, spreadable paste. This should take about 2–3 minutes of mixing.
- Roll Your Ornaments:
- Divide the mixture into 12 equal portions. The easiest way? Scoop with a tablespoon and drop onto a clean countertop, then roll each between your palms like you're making edible snowballs. They should be smooth and compact, about the size of a large marble or walnut. If your hands get sticky, dip them in cold water between rolls.
- Coat Each Ball in Holiday Colors:
- Pour each coating ingredient into its own shallow bowl. Working one coating at a time, place 3 or 4 cheese balls directly into the bowl and gently roll them around until they're completely covered. The coating should stick to the cheese naturally—if it's sliding off, your cheese mixture might be too warm. Chill for 10 minutes if needed. Place each coated ball on a serving platter as you finish.
- Arrange Your Ornament Clusters:
- Group the coated cheese balls in tight clusters of 3 or 4, creating little ornament bundles on your platter. Think of how Christmas ornaments hang together on a tree. Leave just enough space so they feel intentional, not crowded.
- Add the Rosemary Hook:
- Here's where the magic happens. Take a small rosemary sprig and gently press it into the top of each cluster, creating the impression of a hanging ornament with its little hook. Push it in about half an inch—deep enough to stay, shallow enough that it looks delicate.
- Chill and Serve:
- Serve immediately while the coatings still have that fresh, crisp texture, or cover and refrigerate for up to 4 hours. If you're serving them cold from the fridge, pull them out 10 minutes before guests arrive so the cheese is slightly softer and more flavorful.
 Save to Pinterest
 The real magic moment came when I served these at a potluck and watched people's faces light up when they realized they could eat the decorative 'hook.' One guest actually said, 'This tastes like the holidays feel,' and that's when I understood why this recipe matters so much to me. Food that makes people smile, that brings them joy and surprise—that's what cooking is really about.
Building Your Coating Station
Set yourself up like you're running a little production line. Arrange all your coating ingredients in shallow bowls in a semicircle within arm's reach. Have your platter ready at the end of the line. This setup takes an extra minute to organize, but it means you can coat and place each ball without hunting around your kitchen. I learned this the hard way when I first made these and kept forgetting where I put the pistachio bowl mid-process. Plus, setting up this way makes the whole experience feel intentional and fun, like you're creating edible art.
Flavor Variations That Actually Work
Once you master the basic recipe, you can play with the cheese base itself. I've added minced garlic for extra punch, sun-dried tomatoes for a subtle sweetness, even crispy bacon bits for my meat-loving guests. The beauty is that the cheese mixture is so forgiving—it accepts almost any addition as long as you don't go overboard with moisture. I learned this when I once added fresh tomatoes directly to the mix and ended up with a weeping, unstable disaster. The key is keeping anything wet separate, adding it only if you're comfortable with a slightly softer texture.
Making Them Ahead (The Right Way)
You can absolutely make these a day or two in advance, but the timing matters. Mix your cheese base, form and coat your balls, then store them in an airtight container in the refrigerator without the rosemary sprigs. Add the sprigs just before serving—they stay fresher and the presentation feels more special. If you're really planning ahead, you can even freeze the coated cheese balls for up to a month. Thaw them in the refrigerator for a few hours before serving, and they taste like you made them fresh. I've used this trick when hosting back-to-back holiday events, and it's been an absolute lifesaver.
- Make the cheese mixture up to 3 days ahead and store it in an airtight container—it actually develops more flavor as it sits
- Form and coat the balls the morning of, then refrigerate them in a single layer so the coatings stay pristine and separate
- Insert rosemary sprigs no more than 2 hours before serving for maximum freshness and visual impact
 Save to Pinterest
 Every time I make these cheese ball ornaments, I'm reminded that the best recipes are the ones that tell a story and bring people together. This one certainly does that for me, and I hope it becomes a holiday tradition for you too.
Recipe FAQs
- → What cheeses are used for the clusters?
The clusters combine cream cheese, sharp cheddar, and mozzarella for a creamy, flavorful base.
- → How do the coatings enhance the clusters?
Coatings like chopped pistachios, cranberries, poppy seeds, and herbs add texture, color, and contrasting flavors.
- → Can these clusters be made ahead of time?
Yes, prepare the cheese balls and coatings separately, then assemble just before serving for best appearance.
- → What is the purpose of the rosemary sprigs?
Rosemary sprigs serve as decorative 'hooks' to mimic hanging ornaments, adding visual interest and aroma.
- → Are these suitable for gluten-free diets?
Yes, if served with gluten-free crackers or without bread, the clusters themselves are gluten-free.