 Save to Pinterest
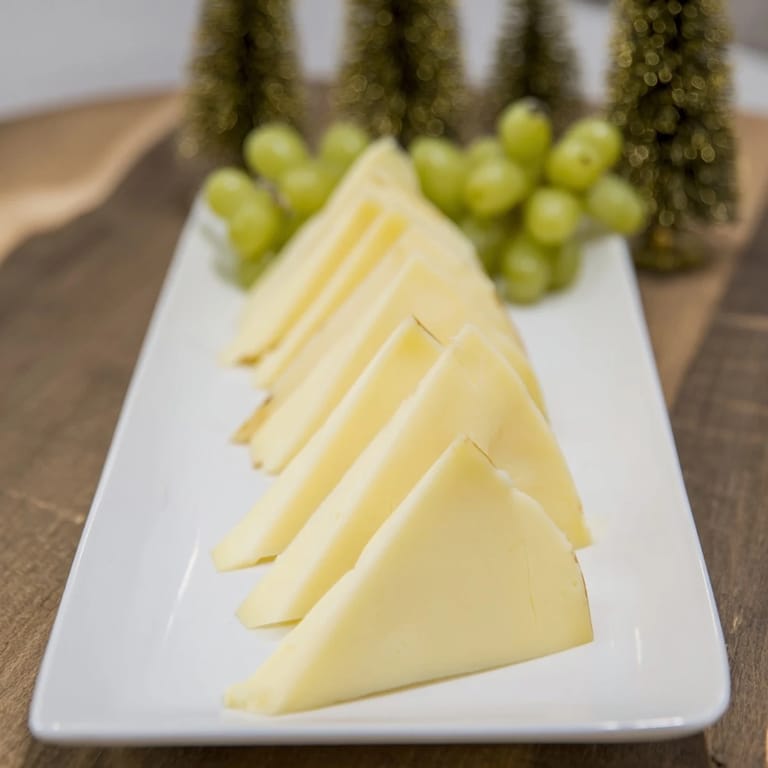
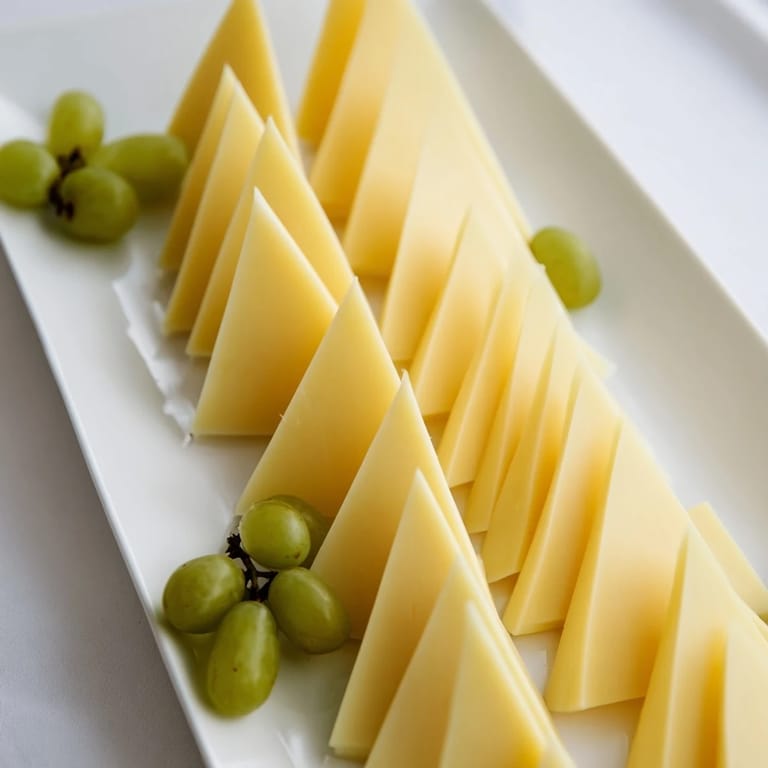
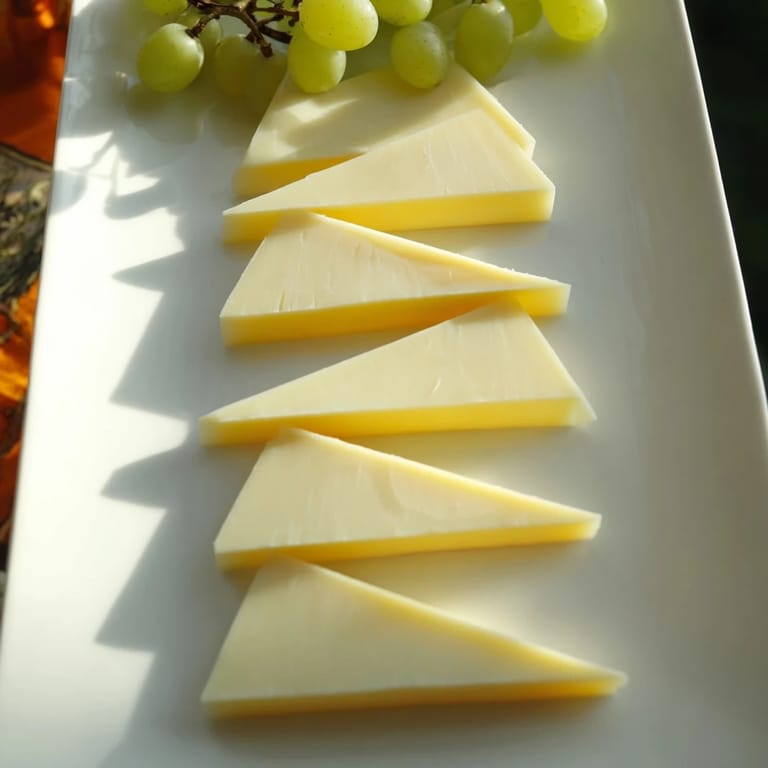
 I'll never forget the year my sister asked me to bring something festive to our family's holiday gathering, and I wanted to skip the usual tired cheese platter routine. That's when I discovered this trick: transforming a simple cheese board into something that actually makes people gasp when they walk into the room. The Tannenbaum Border—those little cheese triangles arranged like a forest of pine trees—became the centerpiece conversation starter that changed how we think about appetizers. It's the kind of beautiful thing that looks like you spent hours in the kitchen, when really, you spent fifteen minutes with a sharp knife and some grapes.
I remember standing in my kitchen three hours before guests arrived, arranging those first cheese triangles and thinking I'd made a terrible mistake—but then something magical happened as the pattern emerged. By the time my mother-in-law saw it, she was pulling out her phone to take a picture. That's when I knew this wasn't just a cheese board; it was edible art that actually tastes incredible.
Ingredients
- 250 g semi-firm cheese (Gouda, Edam, or Emmental): Choose a cheese that's firm enough to slice cleanly into thin triangles without crumbling—semi-firm varieties hold their shape beautifully and have enough character to stand on their own. Make sure it's chilled for at least an hour before you slice it; cold cheese is forgiving cheese.
- 150 g small green seedless grapes: These aren't just decorative—their bright color and sweet burst of flavor bridge the gap between the savory cheese and whatever else you put on the board. Wash and dry them thoroughly on paper towels, or they'll slip around when you're trying to nestle them into place.
Tired of Takeout? 🥡
Get 10 meals you can make faster than delivery arrives. Seriously.
One email. No spam. Unsubscribe anytime.
Instructions
- Chill your cheese:
- Pull your cheese from the fridge at least 30 minutes before you start, but keep it in there until the moment you begin slicing. Cold cheese won't crumble or tear—it'll glide under your knife like butter.
- Create your pine tree silhouettes:
- Using a sharp chef's knife, carefully slice the cheese into thin triangular pieces about 5–6 cm long with a 1 cm wide base. Think of them as little pine tree shapes with the point facing up. You'll get better with each slice, so don't worry if the first few aren't perfect.
- Arrange the forest border:
- Working slowly around all four edges of your board or platter, stand each cheese triangle on its base with the point facing outward, like little evergreens protecting your feast. Leave small gaps between them—this is where the magic happens next.
- Tuck in the grapes:
- Nestle those dried grapes into the spaces between the cheese triangles and around the edges, filling in gaps and creating depth. The contrast between the pale cheese and deep green grapes is what makes this look intentional and festive.
- Complete the frame:
- Step back and look at your work. Does it feel balanced? Are there any empty spots? Keep adjusting until the border feels complete and continuous, like a protective ring of celebration.
- Fill the center:
- Now comes the fun part—fill the middle with whatever cheeses, cured meats, crackers, and treats call to you. The border you've created gives you a beautiful frame for your choices.
 Save to Pinterest
 My proudest moment came when my eight-year-old nephew pointed at the border and said, 'It looks like a Christmas forest,' and suddenly everyone at the table saw it too. That's when I realized this wasn't about impressing people with technique—it was about creating something that sparked joy and made the holidays feel a little more magical.
The Secret to Keeping It Perfect
The trick I've learned is to assemble this no more than 4 hours before serving. The cheese will stay firm and the grapes won't oxidize or get wrinkled. If you need to make it earlier, you can prep everything in advance—slice the cheese, wash and dry the grapes—and then do the actual assembly when you're closer to serving time. It takes all of fifteen minutes, so there's no reason to rush it ahead.
Making It Your Own
This is where you get to play. The classic green grape and pale cheese combination is stunning, but I've experimented with adding small red grapes scattered throughout for a candy-cane effect, or tucking pomegranate seeds between the triangles for a jewel-like shimmer. Some people add tiny sprigs of fresh rosemary tucked between the cheese pieces to really lean into the 'pine forest' theme—the needle-like leaves of rosemary are almost too perfect for this concept.
Setting the Scene
This board deserves a moment. Serve it on a beautiful wooden platter or a large slate board—the backdrop matters as much as what's on it. Surround it with holiday-themed crackers, crusty bread, nuts, and dried fruits. The Tannenbaum Border gives you a framework that elevates everything around it, turning a simple gathering of snacks into a composed, intentional moment.
- Keep the board cool until the last possible moment—if it sits out in a warm room, those cheese triangles will start to droop and lose their shape
- If you're serving this at a party, you can make the border up to 2 hours ahead and leave it in the fridge, uncovered, so it stays fresh and doesn't pick up fridge smells
- Remember that cheese continues to soften as it sits, so make it as close to serving time as you reasonably can for the most impressive presentation
 Save to Pinterest
 This little board taught me that sometimes the most impressive food moments come from simplicity and intention, not complexity. Every time someone sees it, they smile—and that's worth more than any complicated recipe could ever deliver.
Recipe FAQs
- → What types of cheese work best for this border?
Semi-firm cheeses like Gouda, Edam, or Emmental are ideal as they slice cleanly into triangles and hold their shape.
- → How should the cheese be sliced to mimic pine trees?
Cut the cheese into thin triangular pieces about 5–6 cm long and 1 cm wide at the base for a stylized tree effect.
- → Can I use other fruits besides green grapes?
Yes, red grapes or pomegranate seeds can add color contrast while maintaining a festive look.
- → Is this border suitable for gluten-free diets?
Yes, the components used—cheese and grapes—are naturally gluten-free, making this border appropriate for gluten-free guests.
- → How long does the assembly typically take?
Preparation and assembly take about 15 minutes, requiring no cooking.