 Save to Pinterest
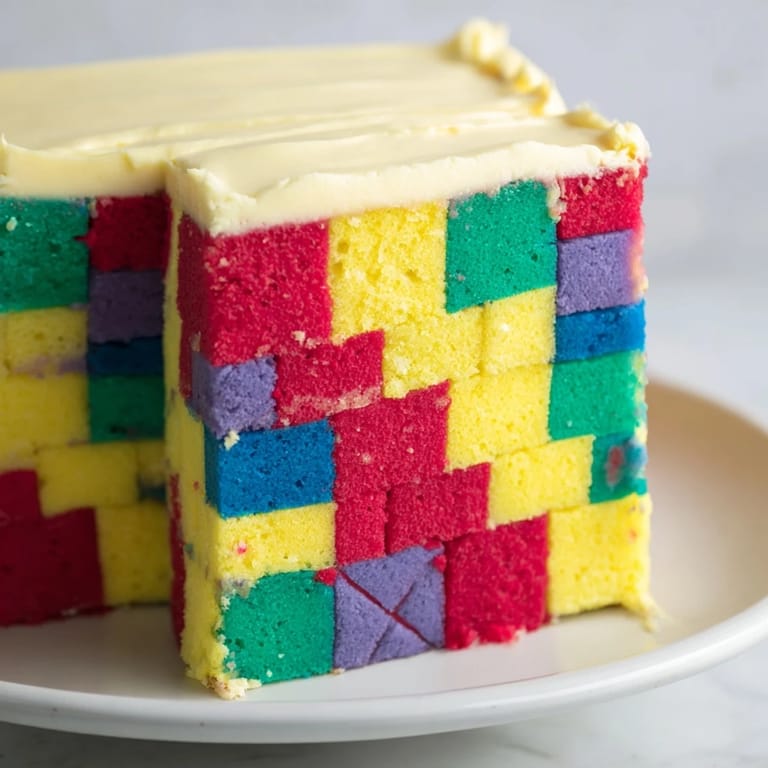
 I still remember the first time I saw a patchwork quilt at my grandmother's house—each square told a story, different colors and patterns stitched together into something beautiful and whole. Years later, I found myself in the kitchen on a rainy afternoon, inspired by that memory, wondering if I could capture that same magic in cake form. The Cozy Quilt Patchwork Cake was born from that moment, and the first time I pulled it from the oven with its five vibrant layers, I knew I'd created something special. It's become my favorite way to celebrate, because every slice feels like sharing a piece of art.
I'll never forget making this cake for my sister's birthday party. Everyone gathered around the kitchen island as I arranged those colorful squares, and the kids couldn't believe it was actually edible. When I brought it to the table, there was this collective gasp, and suddenly the cake became the centerpiece everyone wanted to photograph and remember. That's when I realized this recipe wasn't just about baking—it was about creating a moment everyone would talk about for years.
Ingredients
- All-purpose flour (350 g): The backbone of your sponge; it gives the cake its tender crumb. I've learned to sift it before measuring for the most accurate results, which makes a real difference in texture.
- Granulated sugar (300 g): Beyond sweetness, it aerates the batter when creamed with butter, creating that light, fluffy sponge that melts in your mouth.
- Baking powder (2½ tsp): This is your leavening agent; make sure it's fresh because old baking powder won't give you the rise you need.
- Salt (½ tsp): A pinch of salt enhances all the flavors and balances the sweetness beautifully.
- Unsalted butter (250 g for cake, 350 g for frosting): Room temperature is non-negotiable here; cold butter won't incorporate air properly. I set mine out the night before.
- Large eggs (4): They bind everything together and add structure. Room temperature eggs mix more smoothly into the batter.
- Whole milk (250 ml): It keeps the sponge tender and moist. The fat content matters, so don't use skim.
- Vanilla extract (2 tsp for cake, 2 tsp for frosting): This is your flavor foundation; use real vanilla if you can afford it.
- Food coloring gels (red, yellow, green, blue, purple): Gel colors are essential because liquid food coloring will make your batter watery and ruin the texture. I learned this the hard way.
- Powdered sugar (500 g): For the buttercream frosting; sift it first to avoid lumps.
Tired of Takeout? 🥡
Get 10 meals you can make faster than delivery arrives. Seriously.
One email. No spam. Unsubscribe anytime.
Instructions
- Prepare your workspace:
- Preheat your oven to 180°C and get five square baking pans ready—grease them well and line the bottoms with parchment paper. If you don't have five pans, don't worry; you can bake in batches, though it takes longer. I usually work with what I have.
- Create the creamed base:
- In a large mixing bowl, beat the softened butter and sugar together until it's pale and fluffy, about 3–4 minutes. This step is important; you're incorporating air into the mixture, which is what makes the cake light. Then add your eggs one at a time, letting each one fully incorporate before adding the next. Once smooth, stir in the vanilla extract.
- Combine the dry ingredients:
- In a separate bowl, whisk together the flour, baking powder, and salt. This whisking step distributes the leavening evenly, preventing dense pockets in your cake.
- Alternate wet and dry:
- This is the magic step: add a third of your flour mixture to the butter mixture, stir gently until just combined, then add half the milk, stir again, then another third of flour, the rest of the milk, and finally the last of the flour. Always start and end with flour. This gentleness is what keeps the cake tender; overmixing develops gluten and makes it tough.
- Divide and tint:
- Pour your batter equally into five bowls. This is where it gets fun—add a drop or two of gel food coloring to each bowl and stir gently until the color is evenly distributed. Remember, you want saturated colors but not runny batter, so start small with the coloring.
- Bake the layers:
- Pour each colored batter into its prepared pan, spreading it evenly to the edges. Bake for 20–25 minutes; you'll know they're done when a toothpick inserted in the center comes out clean or with just a few moist crumbs. The cakes should spring back when you gently touch the center.
- Cool with patience:
- Let the cakes rest in their pans for 10 minutes—this allows them to firm up slightly and release more easily. Then turn them out onto wire racks to cool completely. This step can't be rushed; warm cake tears apart. I usually do this step in the evening and let them cool overnight.
- Make the buttercream:
- While your cakes cool, beat the softened butter until it's creamy and pale, about 2 minutes. Gradually add your sifted powdered sugar, a little at a time, beating constantly. Add vanilla extract and a pinch of salt. Once combined, add milk a tablespoon at a time until you reach a spreadable consistency—not too stiff, not too soft. This frosting should hold its shape but spread easily.
- Prepare the squares:
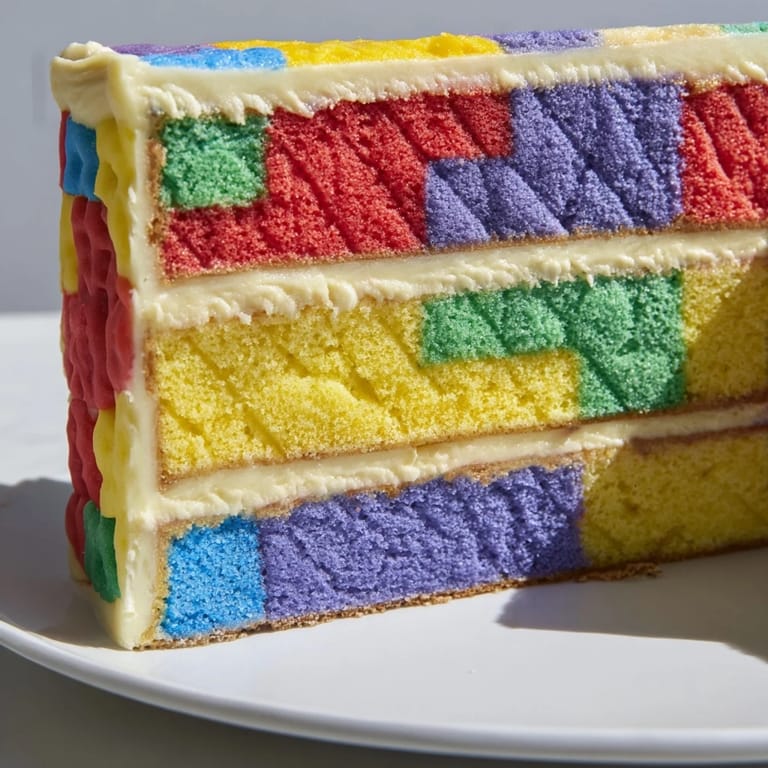
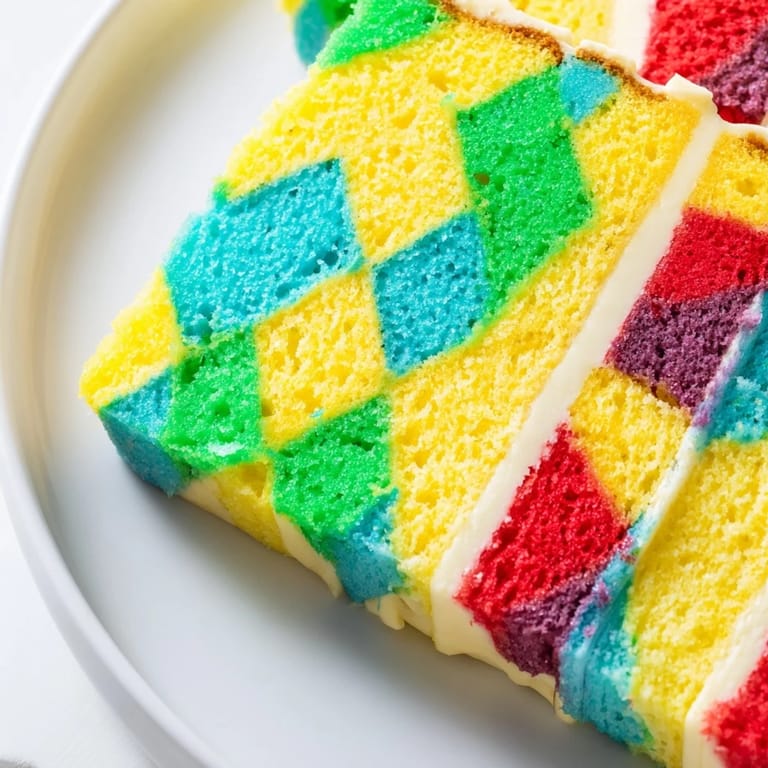
- Once your cakes are completely cool, trim away the crispy edges using a sharp serrated knife. Then carefully slice each colored sponge into uniform squares, about 3 by 3 centimeters. A ruler and knife work better than a cake cutter for this. Precision here makes the final presentation really stunning.
- Assemble the patchwork:
- On a large serving tray or cake base, begin arranging your colored squares in an alternating pattern, creating a beautiful patchwork effect. Use a thin layer of buttercream between each square to glue them together. Start with one color, then alternate with another. Build layer upon layer, rotating colors as you go, until your cake reaches the height you want. Think of it like building a quilt—there's no single right way; trust your instincts with the color arrangement.
- Frost and finish:
- Once your patchwork is built, apply a thin layer of buttercream frosting to the top and sides, smoothing it with a spatula. If you want, pipe thin buttercream lines between the visible squares to really emphasize the quilted effect. This is where you make it truly yours.
- Chill and serve:
- Refrigerate the finished cake for at least 30 minutes before slicing. This helps the buttercream set and makes slicing cleaner. When you cut into it, you'll see all those beautiful colored squares, and it's always worth the wait.
 Save to Pinterest
 There was a moment, standing in my kitchen late at night, putting the finishing touches on the frosting and piping those decorative lines between the colored squares, when this recipe became more than just food to me. It felt like I was creating something that would bring people together, something they'd remember and talk about. That's the real magic of this cake—it's not just about the baking; it's about the joy of making something beautiful with your own hands and sharing it with people you care about.
The Art of Color Choice
One of my favorite discoveries with this recipe is how the colors you choose completely change the mood of the finished cake. I've made versions with soft pastels, vibrant jewel tones, and even monochromatic shades of one color. Each time, it tells a different story. The beauty of this cake is that it's deeply personal—your color choices reflect your style and the occasion. I've found that standing in front of my pantry of food coloring gels and choosing five colors is almost meditative. My sister prefers rainbow order, but I love creating patterns with complementary colors. There's no wrong way to do this; the point is to enjoy the process and let your creativity guide you.
Why This Cake Works for Any Occasion
What I appreciate most about the Cozy Quilt Patchwork Cake is its versatility. It looks elegant enough for a wedding celebration, yet feels comforting enough for a casual family gathering. I've brought it to potlucks, birthday parties, anniversaries, and even just because afternoons. People respond to it the same way every time—with genuine delight and wonder. It's become my go-to cake for creating moments. The sponge itself is forgiving enough that even if you're not a seasoned baker, the technique is approachable. And if something goes slightly imperfect, the patchwork nature of it actually hides small imperfections beautifully. The flaws become part of the charm.
Flavor Variations and Serving Ideas
While vanilla is the classic base for this cake, I've experimented with many variations that make it even more special. Adding a teaspoon of almond extract to the batter gives it a subtle nuttiness that people often can't quite place but absolutely love. I've also tried lemon or orange zest, which adds a bright freshness that's wonderful in spring and summer. For chocolate lovers, you can replace a quarter of the flour with cocoa powder in some of your colored batches to create a mixed palette. When it comes to serving, I've discovered that this cake is best enjoyed with lightly sweetened whipped cream on the side or fresh berries scattered around the plate. A cup of tea alongside a slice feels like the perfect combination, turning a simple dessert into a proper moment of comfort.
- Try adding citrus zest to the batter for a fresh twist that pairs beautifully with the buttercream.
- Almond extract creates a subtle depth that makes people ask what your secret ingredient is.
- Serve with whipped cream and fresh berries to add lightness and fruit flavor to complement the richness of the buttercream.
 Save to Pinterest
 This cake has taught me that sometimes the most memorable desserts are the ones that make people pause and smile before they even take a bite. There's something about creating beauty in the kitchen and then getting to share it that fills me with genuine joy. I hope this recipe brings that same feeling into your kitchen.
Recipe FAQs
- → How do I achieve vibrant colors in each sponge layer?
Use gel food coloring for vivid, bright hues without altering the batter consistency. Add colors gradually until desired intensity is reached.
- → What’s the best way to cut the sponge layers for patchwork effect?
Trim the edges for evenness, then slice the cooled sponges into uniform squares about 3 cm wide for a clean and consistent patchwork appearance.
- → How should the buttercream be applied between squares?
Spread a thin layer of creamy buttercream as ‘glue’ between each sponge square to hold the layers together while creating a smooth surface.
- → Can this layered cake be prepared in advance?
Yes, assembling and chilling for at least 30 minutes helps the layers set, making slicing easier and preserving the quilted look.
- → Are there variations for dietary restrictions?
Substitute all-purpose flour with a gluten-free blend for gluten-free needs, and consider using dairy-free butter and milk options to suit dietary preferences.